A stair stringer is the sloped board that carries the steps. It is a plank with notches cut into its top edge, one for each tread and riser, and most wood stairs use two or more of them side by side. Getting the numbers right before you pick up a saw is what makes every step come out the same.
This guide works through one complete example, so you can follow with your own measurements. The numbers come from a stair with a total rise of 108 in.
What you need before you start
- The total rise: the vertical distance from the finished lower floor to the finished upper floor.
- The tread depth you have room for.
- The stock the stringer will be cut from. This guide uses a 2×12, which is 11¼ in deep.
- The thickness of the treads you will use.
Step 1: measure the total rise
Measure from finished floor to finished floor. If the finished surface does not exist yet (a floor still to be tiled, for example), add its thickness to your measurement, or the first and last steps will be off. The total rise guide covers this step in detail.
Step 2: choose the number of risers
Divide the total rise by a riser height near 7 in, and round to a whole number. Then divide the total rise by that whole number to get the exact riser height.
- 108 ÷ 7.5 = 14.4, which rounds to 14 risers.
- 108 ÷ 14 = 7.71 in per riser.
Keep the exact value, 7.714 in, in your notes. Every riser must be the same.
Step 3: tread count and total run
A straight stair has one fewer tread than risers, because the upper floor acts as the last tread. If you plan to build a full tread at the top, you have as many treads as risers.
- 14 risers give 13 treads.
- With a 10½ in tread, the total run is 13 × 10.5 = 136.5 in.
Step 4: check against the code and for comfort
Compare the numbers with the limits in the IRC stair requirements guide: riser no more than 7¾ in, tread at least 10 in. The comfort guide explains the 2 × riser + tread rule, which here gives 25.9 in, a little steep but legal.
Step 5: check the throat
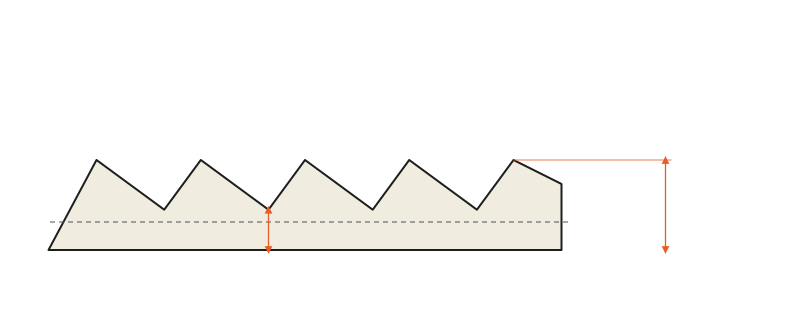
The throat is the wood left under the deepest part of a notch. If it is too thin, the stringer is weak where it matters most. A commonly used minimum is 3½ in.
For a 2×12 (11¼ in deep):
- Remaining wood = stock depth − (riser × tread ÷ √(riser² + tread²))
- Remaining wood = 11.25 − (7.714 × 10.5 ÷ 13.03) = 11.25 − 6.22 = 5.03 in
That is comfortably above 3½ in. A steeper stair or a shallower board, such as a 2×10, would leave less. In that case, use deeper stock or a gentler pitch.
For deck and other exterior stringers, trade guidance asks for more: at least 5 in of uncut wood. The deck stairs guide covers the rest of what changes outdoors.
Step 6: lay out the notches
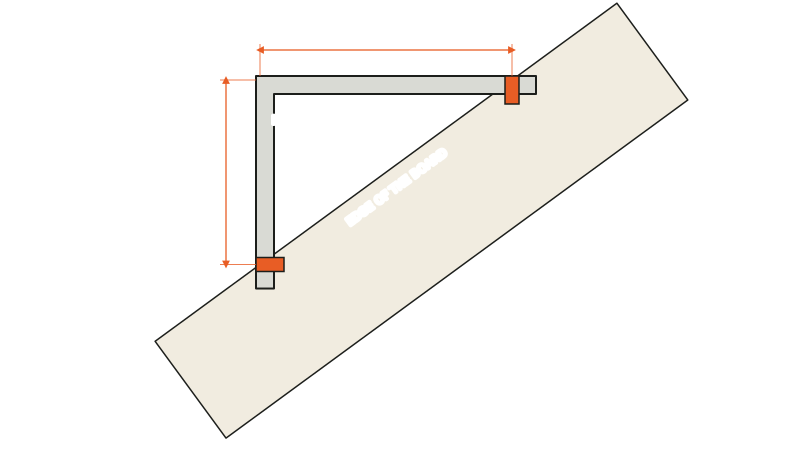
The usual tool is a framing square with two stair gauges clamped to it. Clamp one gauge at the riser height on one leg and the other at the tread depth on the other leg. Then:
- Place the square on the board with both gauges against the same edge, and mark the tread and riser lines.
- Slide the square along until the riser mark lines up with the end of the previous tread mark, and mark again.
- Repeat for every step.
Watch for rounding. A square is marked in sixteenths. A riser of 7.714 in is closest to 7 11/16 in, which is about 1/32 in short, and over 14 risers that adds up to nearly 3/8 in. After laying out, check that your notches add up to the total rise, and correct the layout before you cut, not after. Using the exact number and a tape, or a story pole, avoids this.
Step 7: subtract the tread thickness from the first riser
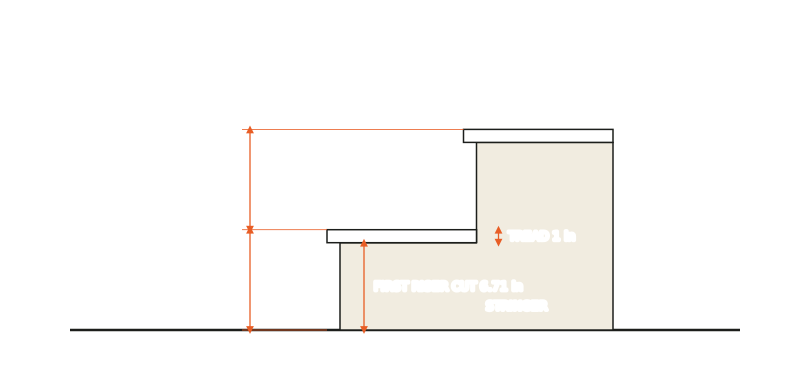
The stringer’s notches support the underside of the treads. Once a tread is installed, its top is higher than the stringer’s top by the thickness of the tread. If every notch were cut the same height, the first step up from the floor would end up one tread thickness too tall.
To fix this, shorten the first riser cut by the thickness of the tread:
- Riser height 7.71 in − tread thickness 1 in = first riser cut of 6.71 in.
After the treads go on, the first step from the floor will be the same 7.71 in as the others. If you also have finished flooring at the top or bottom, include its thickness too.
Step 8: cut
Use a circular saw for the long lines and stop at the inside corner, without going past it. An overcut into the throat weakens the board. Finish the corners with a handsaw or jigsaw.
Step 9: test and copy
Hold the first stringer in place and check that the treads’ tops are level and each riser is plumb. If it fits, use it as a template for the other stringers, so they are all identical.
How many stringers
It depends on the stair width and what the treads are made of. A 36 in wide stair is commonly built with three stringers, one at each side and one in the middle, about 18 in apart. Wood treads are often limited to about 16 in apart, which would mean four stringers at that width. Composite treads usually need to be closer, and manufacturers publish their own limits. The IRC does not set a stringer spacing, so follow your tread manufacturer’s instructions and your local building department. The stringer count guide shows a simple way to calculate it.
Step 10: how long a board to buy
Two numbers come up:
- The diagonal, √(rise² + run²), is 174 in here. It is a quick estimate of stringer length.
- The actual board length for the layout above is about 157 in, because the notches and the cut at each end take some of the board away.
Standard boards come in 2 ft steps, so round up. For 157 in, a 14 ft (168 in) board is enough. If you cut the stringer from a board with knots or defects, leave extra length so you can place the layout on clean wood.
Common mistakes
- Measuring to the unfinished floor instead of the finished one.
- Forgetting to subtract the tread thickness from the first riser.
- Rounding the riser height and ending up with a last step that does not fit.
- Cutting past the corner into the throat.
- Using a stringer with too little wood left under the notches.
Do it with the calculator
The stair calculator does steps 2 to 5 and 7 for you and draws the stringer layout, with the first riser cut, the pitch angle, the throat and the minimum board length for the stock you choose.
Sources and further reading
- JLC: Stair stringers, calculation and layout
- Fine Homebuilding: how to cut stair stringers
- This Old House: how to cut stair stringers
- Decks.com: how to lay out deck stair stringers
- InterNACHI: inspecting stair stringers
Try it with your own numbers.
The stair calculator checks your rise and tread against the IRC, shows the stair in 3D and prints a dimensioned plan.
This guide is general information, not engineering or legal advice. Building codes differ by location and edition, so confirm the rules with your local building department before you build.